


Click 'Start selection' button to begin (load image first).
Click top-left corner of area 1. or 'done' to add whole image description.
Now click bottom-right corner ...
Click 'Get area coords' button, or click top-left again to restart for area 1.
Input title and description, 'Generate RDF', then 'Start new selection' (skip 'Generate RDF' if need to re-select area 1).
Describe whole image, and complete annotation by adding it to RDF.
Test RDF with online XSLT, or load new image.
Click 'Start new selection' to select another area.
Step by step: 使い方の説明
-
Specify the image URI to annotate. You can select a local file via file system dialog.
最初に画像のURIを入力して、画像をロードしてください。ローカルのファイルでもウェブ上のものでも構いません(ローカルファイルの場合は、生成後にfoaf:Imageの主語URIを絶対URIに修正してください)。
-
Then click "Start selection" button to select a part of the image. Selection is done not by dragging, but by clicking top-left, and then clicking again at the bottom-right. Click "Get area coords" button when done. If you click the image without get area coords, you will re-select the area.
画像をロードするとエリアの選択が始まります。サンプル画像を使う場合は、"Start selection"ボタンでエリアの選択を開始してください。選択は「ドラッグ」ではなく、エリアの左上をクリックし、もう一度右下をクリックします。選択が終了したら"Get area coords"ボタンで座標を取得してください。座標を取得しない状態でもう一度画像をクリックすると、エリアの再選択となります。
-
Input the title and description of the area, then click 'Generate RDF' button. You can select another area by clicking 'Start selection' button.
選択したエリアのタイトルと説明を入力し、'Generate RDF'をクリックしてください。もう一度'Start selection'ボタンをクリックすると、別のエリアを追加選択できます。ここで、「エリアの説明」と「エリアに描かれているものの説明」の違いに注意してください。
- エリアの説明 Area description
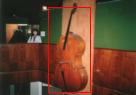
- Description of the area as a part of the image. For example, 'This contrabass is exhibited on a wall of a stair because it is too tall to put on the floor'.
- 画像の中のエリアがどんな役割/位置づけであるかを記述します。たとえば「巨大なコントラバスは、床に置くには背が高すぎるので、階段の途中に展示されている」といった説明が該当します。
- エリアに描かれているものの説明 Description of what is depicted
- Description of the thing that is depicted in the area. For example, 'Contrabass is the largest and lowest member of string instruments'.
- そのエリアが描いているものについての説明です。たとえば「コントラバスは最低音域の弦楽器で、豊かで暖かい音色を持っています」。
-
Once all needed areas are described, then click 'done', and describe the whole image.
必要なエリアの選択と記述を終えたら、'Done'ボタンをクリックし、画像全体のタイトル、説明、作者などを記述します。
Annotation examples: アノテーションの例
There are some examples of image area annotations and their XSLT/CSS presentation.
画像のエリアに注釈を加えたRDFと、それをXSLT/CSSでレンダリングしてみる例をいくつか挙げておきます。
- People at yakitoriya, after W3D Day 2003
- オーケストラの金管楽器 (Japanese)
- A scene at orchestra stage rehearsal
- A view from Tamachi station platform
- Grapefruits
Since these annotations are RDF/XML metadata, different presentaition is also possible with another stylesheet. The following is rendering example with special XSLT for voice browser (in Japanese).
これらの注釈はRDF/XMLのメタデータなので、違う形でレンダリングすることも可能です。例えば、画像の内容を音声読み上げで理解できるように工夫したXSLTを用いてみます。
Another example of different presentation. This time annotations are presented via XHTML image map.
あるいは、XHTMLのイメージマップに変換することもできます。
Notes
Property 'image:depicts'
In this trial annotator, a property 'image:depicts' is used to describe what the region depicts. Although it is important to distinguish between the description of the region itself and that of what the region depicts, the property for that purpose is not defined. 'image:depicts' is one candidate from Jim Ley's vocabulary. Another possibility is 'foaf:regionDepicts', which is not yet defined, too.
ここでは、エリアに描かれているものを説明するプロパティとして'image:depicts'を用いています。エリアそのものの説明と、エリアが描くものの説明を区別することは重要ですが、後者のためのプロパティはまだ明確に定義されていません。'image:depicts'はその候補のひとつで、他には'foaf:regionDepicts'というプロパティも検討されています。このプロパティの用法は、将来変更する可能性があります。
Shape of ther area
In this trial annotator, the shape of the area is limited to 'Rectangle' in order to make it easy to use CSS. Jim Leys vocabulary also defines another shapes such as Circle, Polygon etc.
ここでは、CSSによるプレゼンテーションを容易にするために、エリアの形はRectangleのみを用いていますが、Jim Leyの語彙ではCircle, Polygonなど他のクラスも定義されており、もちろんこれらを用いた注釈も可能です。
For further discussion, see Note: Image description 2004 in this site.